Integration Steps
There are three simple steps for integrating Zyler Go on Webflow when using Ecommerce collections:
Step 1: Including the Script
Copy and paste the script into the "Head code" for your website:
- Navigate to "Settings" -> "Custom code".
- Scroll to "Head code".
- Copy and paste the script below into the textbox, replacing
<partner-id>with your value from the Partner Portal.
<script defer partner-id="<partner-id>" platform="webflow" src="https://www.zyler.com/js/platform-integration/v1/index.js"></script>
The script uses the defer attribute which is recommended for use if including scripts in the <head>. This ensures the script does not run until the browser has finished loading the page content.
Step 2: Styling Using CSS
To style your Try On buttons, copy and paste the following CSS into the same section as the script, either above or below it. You can edit it to match the brand of your website as you see fit.
    <style>
      .zyler-try-on-cta {
        display: block;
        width: 75%;
        color: black;
        border: 1px black solid;
        border-radius: 2rem !important;
        padding: 0.5rem 1rem !important;
        background-color: white !important;
        cursor: pointer;

        &:hover {
          background-color: #f0eff0 !important;
        }
      }

      .zyler-button-div {
        display: flex;
        justify-content: center;
        width: 100%;
      }
    </style>
Step 3: Configuring your Site
The PLP and PDP need to be configured separately:
PLP Configuration
The PLP requires the addition of three new "Style selectors":
zyler-collection: this is used by the script to locate the list of products.zyler-collection-item: this is used by the script to locate the individual product for adding in the Try On buttons.zyler-product-id: this is used by the script to retrieve the slug value of the individual product.
These will be added to "Collection Wrap", "Collection Item" and "Product Image Wrap" respectively within the element hierarchy. These nodes are highlighted in the example below:
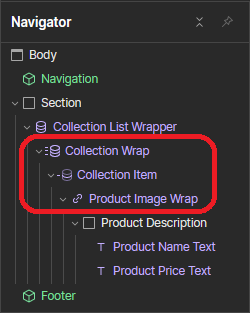
While in design mode for your website, add the new Style selectors to the PLP by doing the following:
-
Navigate to "Pages" -> "Static pages" -> "Products".
-
Click on the "Collection Wrap" element and add
zyler-collectionto the Style selectors, as below: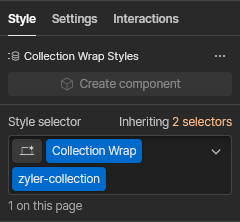
-
Click on the "Collection Item" element and add
zyler-collection-itemto the Style selectors, as below: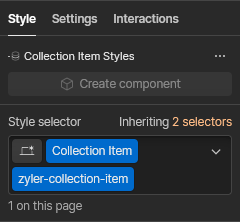
-
Click on the "Product Image Wrap" element and add
zyler-product-idto the Style selectors, as below: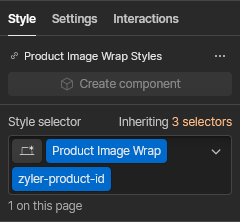
The above steps modify these elements specifically within the PLP to ensure that Try On buttons only show up on the intended page, preventing them from unexpectedly appearing elsewhere.
PDP Configuration
The PDP requires the addition of a single new Style selector: zyler-button-container. This tells the script where to create the Try On button. While in design mode for your website, add this to the PDP by doing the following:
-
Navigate to "Pages" -> "Ecommerce pages" -> "Products Template" so that you can edit the PDP.
-
Add
zyler-button-containerto the Style selectors of any existing element (or new element). The script uses this to add the Try On button as the last child element within the element, so this gives you some flexibility and control over the positioning of the button on the PDP.In the following example, the Try On button appears at the bottom of the product details section:

To position the Try On button like this,
zyler-button-containercan be added to the Style selectors of the existing element named "Product Details Wrap":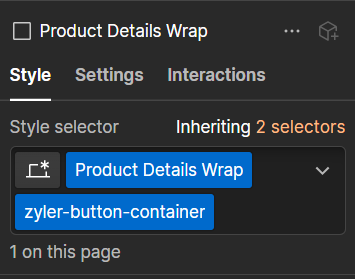 Note
NoteIf you are adding to a new element, the above steps are very similar.
This completes the integration steps. Zyler Go is now part of your Webflow site.